
This week Gary got in on the action before I had posted the picture. Pretty impressive! He saw the picture over on my Flickr account and emailed me some comments and observations on cropping the picture, which I have followed, pretty much as he suggested:
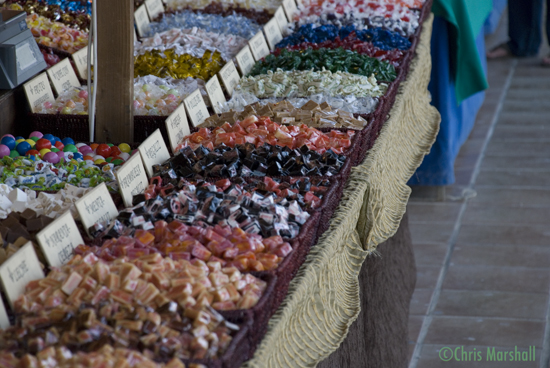
Something you might like to consider for Sweets would be to make a pretty much square crop of the image. Keep the entire image from the left, but crop it on the right just where the blue tablecloth from the next table begins to appear. (That’s slightly wider than square, but it’s not far off.) It would “balance” the angles of the opposite ends of the main row of baskets. It would also crop out he sandalled feet of the customer at the top right of the existing image.
There’s an American magazine I am able to get here in Glasgow from my local Borders store called Outdoor Photographer.
It’s more about the person behind the lens than it is about the photographs they produce – hence the name not being Outdoor PhotographY. Having said that, they publish lots of stunning quality images, so their photographer subjects are pretty damn good at what they do. I’ve been buying it for several years now and – getting to the point – one bit of advice I can recall seeing several times could be reduced to “omit the unnecessary”.
I certainly don’t always remember this myself when I’m behind the viewfinder. Sometimes I do remember it but (obviously) can’t change the aspect ratio of the viewfinder to follow through at time of shooting. So I try to remember when I’m back at the computer that “this image was to be cropped square” or “crop the top of the sky and the lower foreground to make a panoramic crop”. Things like that. (Sometimes, though, I look at an image and think “why on earth did I not immediately delete that? – it’s poor (or even rubbish)!” That is supposed to be a trigger for me to look “within” the image and try to recall what the original motivation was… 🙂
Anyway, I hope you don’t mind me saying that I think the right hand section of Sweets – the tiled floor – adds nothing to the image. Cropping the image as described makes for a much stronger image. IMHO.
I actually squared it as he suggested, but then felt that the sweets at the front being too out of focus distracted from the rest of the picture. I also used Photoshop to lighten the picture a little.
As far as using it as my desktop goes I have set it to tiled (as the picture at the end of this article taken with Skitch shows) which is fun but someone difficult on the eye! Still it is a really cheerful which is a pretty cool way to start off the day each time I fire up the Mac.

Before
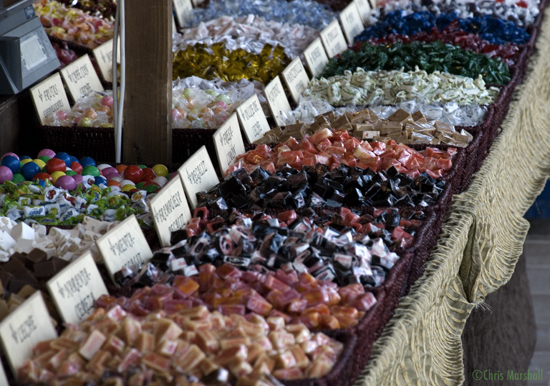
Here is the picture as originally taken:
My thinking/plan at the time was that the colours gave a good representation of the fun and festive nature of the event, so I was trying to capture something that would reflect that rather than show a specific picture of the event.
As ever your comments will be most welcome.
I too like it better cropped. Was wondering how it would look with less, (more? I keep getting mixed up…) depth of field so that all the candy would be in focus? As I follow the picture left to right bottom to top, the left bottom kind of messes with my eyes. Of course, that’s just my opinion. 🙂
Like it anyway!
I agree – and when I can a) figure out which way round the depth of field thing works and b)remember when I am shooting I am sure things will get better 🙂
> This week Gary got in on the action before I had posted the picture. Pretty impressive!
Actually, Chris, it’s even better than that! When I was tinkering with the image in Photoshop, I noticed in the histogram that the top end of the tonal range was almost unused. However, rather than add that in on top of the suggestions I was making, I decided to omit that from my email and merely thought “brighten the image”. And … you got the message: “I also used Photoshop to lighten the picture a little.”
My little psychic grasshopper…. 8)
For my next trick, I shall concentrate on what you should pick for next weeks “Current Desktop” feature before you’ve even thought of it yourself! Readers – watch this space to see if Chris gets it right… 😉
As I can remember the depth of field is achieved with aperture. The more open it is, the less depth of field you are going to get. So if I’m mixing up the terms, here is what I understand. When aperture is open at let say f4.5, the your subject will be in focus and everything else beyond the subject will be out of focus. To get everything in focus, one would close the aperture to f11 or more.
I hope I explained it right.
Mac, I believe you are correct! Thanks. Always get them mixed up because they are opposite of each other, (DOF and aperture.) So the greater the depth of field the smaller the aperture. Who made up this stuff, anyway? Kodak?
That is how I understand it – doesn’t mean I remember it at the crucial moment though!
Try thinking of “the bigger the number, the bigger the depth of field”.
f1.8 – small depth of field
f28 – big depth of field
After a while, you won’t have to think about it…
(NB Given a constant aperture, other factors can influence the DOF: the focal length of your lens (eg 20mm versus 200mm) and, if I remember correctly, the distance to your point of focus. But lets leave that for another day… 🙂 )
Thanks Gary! Now I believe it’s as clear as a freshly poured pint of Guinness in a dark pub. Anyway, I’ll get it one of these days. I’ve got to agree with Chris, though. You can read and read and read, but when your out and it comes time to take the shot, It’s like it all goes out the window.
All I remember is, everything in focus, make your f-stop high. Foreground in focus, f-stop low. Same with Macros, high f-stop with a longer shutter speed will bring the macro into focus a lot better than with the opposite.
Talking of Guiness – think I need 2 or 3 now!!!
With still subjects you have time to compose the shot, think about all the rules and regulations, but when it comes to something moving, some kind of action, it’s hard to remember everything, when you have a split second to actually capture anything. That’s why I snap as much as possible and sort them out later, hoping I got something good in the pile of rubbish.
To be honest I still need to get over the feeling of being self conscious when I am taking photographs! Get the D80 out against the P&S and I feel a bit ‘funny’.
@ Wayne – I can vaguely remember my lingering confusion over aperture size versus depth of field from the “early days”. It will go away in time.
What you said you remember – “everything in focus, make…” – is pretty much just another way of wording what I said – so you’ve got it! 🙂
@ Mac – re moving subjects. I know what you mean. It just comes down to experience – ie practice. In time you will become comfortable with the theory. And as long as you’re familiar with your tools – ie your camera/lenses – you’ll be in a better position to put the theory into practice, even with dynamic shots.
@ Chris – I remember it the other way round. When I got my first digital camera, it was a PowerShot G2. I remember feeling self conscious/odd on the busy lunchtime streets of Glasgow taking some shots by holding the camera away from my face and using the LCD panel. Fortunately, it didn’t last too long.
<yoda>With practice, confidence will come.</yoda> 🙂
Not to sure – I am Mr Sit in the corner and stay away from crowds guy!!!
For that Mr. Sit-in-the-corner you should get a nice zoom lens. 🙂
There you go spending my money again 🙂